Sunday, May 27, 2018

Recipe: Low carb bacon quiche


When eating low carb there's one thing I miss terribly and that's pastry. I had heard of people using the infamous fathead pizza dough as a low carb pastry alternative and boy howdy is it good. 

It's very versatile and handles like any wheat based pastry would. This opens a whole world of low carb cooking options that I didn't have before!


Pie Crust:


2 cups pre shredded mozzarella
3/4 cup almond meal/flour
2 tbspn cream cheese
1 egg
1/2 tspn dried rosemary
1/2 tspn garlic powder
salt and pepper to taste


Method:

  • Mix the shredded/grated cheese and almond flour/meal in a microwaveable bowl. Add the cream cheese. Microwave on HIGH for 1 minute.
  • Stir then microwave on HIGH for another 30 seconds
  • Add the egg, salt and any herbs or seasonings then mix gently
  • Place in between 2 pieces of baking parchment/paper and roll into a circular pizza shape 
  • Remove the top baking paper/parchment. 
  • If the mixture hardens and becomes difficult to work with, pop it back in the microwave for 10-20 seconds to soften again but not too long or you will cook the egg.
  • Make fork holes all over the base to ensure it cooks evenly.
  • Slide the baking paper/parchment with the pie crust, into the pie tin
  • Back on 425 for 6-10 minutes or until the top has browned. 
  • The base Doesn’t need to cook through but seal the top so the base doesn’t become soggy when the mixture is added. Put aside and let cool.

Quiche Filling:


5 eggs
2 medium brown onions or leeks
6 rashers bacon
2 tbspn butter
1 cup half and half
1 cup grated cheese - ½ cup mozzarella, ½ cup sharp cheddar


Method:

  • Preheat oven to 400F and warm while you prepare the filling
  • You can use onions or leeks depending on your carb needs, leeks are lower in carb and give a milder flavour
  • Slice the onions and put in a pan with the butter on a very low heat to sweat
  • Cut the bacon while the vegetables cook
  • Once translucent add the bacon and fry until the bacon is chewy but not crisp
  • Set asside the vegetable bacon mix while you prepare the egg batter
  • In a bowl mix half and half, eggs, salt and pepper until well combined; add the onion, bacon and cheese and fold carefully
  • Pour the mixture into the pastry shell, making sure to move the solid ingredients around to be even in the pan
  • Cover the dish with foil to avoid over burning the mixture
  • Cook with the foil on for 35 minutes then remove the foil and cook for another 5-10 minutes until the top is a golden brown. 
  • Take out of oven and let sit for 5-10 minutes to allow the egg to set properly.
  • Once cooled cut into slices and server with vegetables or a salad.
  • Due to the high fat content in the base and mixture be careful with serving size, this dish should serve 6 - 8 comfortably or 4 heartily

Monday, February 19, 2018

Recipe: Low carb (sugar / gluten free) baked cheesecake

This is a recipe inspired by the classic Junior's Cheesecake recipe but tooled slightly to add a low carb base and remove the sugar. The result is a creamy and delicious cake with a lot less guilt. Remember to be sensible though this is not a low calorie recipe - don't fool yourself that you can have a bigger slice even if you want to!


Low Carb Baked Cheesecake 


Base

1/2 cup almonds
1/4 cup walnuts
1/2 tspn pumpkin pie spice
20g butter

Batter

4 packages of cream cheese (8 oz or 225g each)
1.5 cups Splenda granulated sweetener (or equivalent low carb sweetener)
1/4 cup cornstarch
1 tbspn pure vanilla extract
2 extra large eggs
3/4 cup heavy whipping cream


Method


  • To prepare the base place the nuts, butter and spice in a food processor 


  • Pulse until the nuts have crumbled and the butter is distributed evenly, you should be left with a moist dough like consistency


  • Line a 7 or 9 inch spring form pan with baking paper, making sure to leave enough slack to fill the bottom of the pan
  • Even out the base using the back of a spoon to leave an even thin layer of the nut mixture


  • Preheat the oven to 165C (325F) and set the pan asside while you prepare the batter
  • Room temperature cream cheese works best for this recipe - cold cheese will be harder to beat
  • Where possible use a paddle attachment rather than a whisk, this helps with the creamy texture 
  • You can use other sweeteners if you prefer (like Stevia or Erythritol) but the baking Splenda holds the best taste after baking. 
  • Make sure to use the "spoon for spoon" granulated Splenda powder that measures like sugar and not coffee packets of Splenda which is highly concentrated
  • Add 1 pack of the cream cheese, 1/2 cup of Splenda and the corn flour to the mixer and beat until well combined


  • Scrape down the sides and then add 1 more pack of cream cheese and 1/2 cup Splenda, then repeat with the remaining cheese and sweetener
  • Add the vanilla essence and one egg, beat on slow until well combined then add the remaining egg
  • Turn off the machine and add the cream, again beating on slow to avoid liquid splashes

  • Once all ingredients are in the bowl turn the mixer to medium and beat for 2-3 minutes or until the mixture takes on a billowy texture
  • Pour the batter into your tin with the nut base then jiggle the tin slightly to flatten the top, be careful not to tap the tin too hard or you will lose air from the cake
  • This cake requires a water bath - place the tin into a roasting tray or casserole dish and fill with water to about halfway up the spring form tin

  • Bake until the top is golden and no longer wobbles, about 1 hour. For best results turn the cake half way through
  • Once baked remove the roasting tray from the oven and then remove the tin from the water. Set asside to cool leaving it in the tin for 2 hours
  • After 2 hours cover the cake and refrigerate until cold or preferably the next day. Release and remove the springform pan after cooling, if possible just before serving
  • Serves 8 people - on its own or topped with cream or nuts for a low carb option or any other cheesecake topping if you prefer

Sunday, January 21, 2018

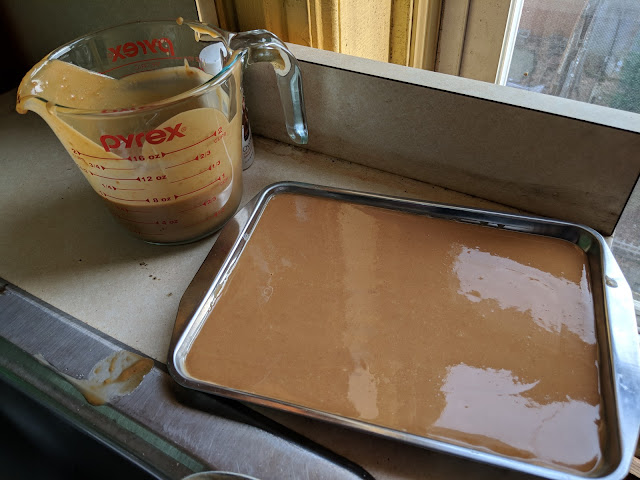
Recipe: Sugar free vegan peanut butter fudge

This recipe is one of those happy accidents, I was making sugar free white chocolate and used the wrong sweetener which split the cocoa. I decided to salvage the mess and this is the delicious result full of healthy fats. Cocoa butter is a new ingredient for me in my kitchen arsenal - it keeps high fat low carb desserts stable at room temperature and adds a creaminess without the use of dairy.

Your mileage may vary on low carb sweeteners and glycemic index. If you are keeping low carb be sensible about what works for you and switch out the erythritol for stevia or sucralose. Erythritol is the perfect sugar replacement for me when making confectionary, it has 0 impact on my blood sugar and has a pleasant cool mouth feel, you can even powder it to work like icing sugar.  Remember if you're not keeping low carb you can always use icing sugar or castor (baker's) sugar.


Sugar free vegan peanut butter fudge 


1 cup smooth peanut butter
1/2 cup coconut oil
1/2 cup cocoa butter
1 cup powdered erythritol (Swerve)
1 tspn vanilla essence


Method


  • You can use either the stove or a microwave to make
  • If using a stove add the fats to a pan and turn on low heat or use a double boiler to melt fats gently together

  • If using a microwave place all fats in a glass bowl and microwave on medium for 90 seconds
  • Add the erythritol and stir, heat for another 1-2 mins or until a spoon comes out of the mixture smooth with no visible grains 
  • If using the stove remove the pan from the heat - then add the vanilla. Otherwise you risk the alcohol causing the mixture to boil rapidly.  Stir until the vanilla is evenly distributed


  • Pour into a small tray or fudge tin and then refrigerate for 3 hours
  • Cut with a hot knife, makes approximately 40 pieces
  • 54 Calories, 6g fat, 4g carbs (net < 1g) per piece